
I have reviewed my fair share of papers over the years and seen some heinous crimes in video editing for the customary media attachement: blurry, too large, strange codecs only recognized by VLC, mouse cursor and other GUI elements visible on screen, double letterboxing or outright interesting choices of aspect ratio. Several factors play into this, such as the usual last minute pressure when compiling a paper, the oh-gawd-we-surpassed-the-maximum-attachement-size limitations of most submission systems or that the constant recompression just takes too long and the authors are happy with what they got.

It is clear however that the cause for this confusion is that video encoding is firmly situated at the borderline to black magic. There are certainly tools like iMovie which tremendously help to overcome most troubles in standard editing and encoding, but somewhere in between incompatible codecs and file containers, video bitrates, quantization and scaling issues, frame re-timing, color compression, and total boredom because you just wanted a video everyone will give up sooner or later.
In this post I’m going to cover the topic of how to create a web-browser compatible, pixel-matching HD or Full-HD, H.264 compressed MP4 of a reasonable size from a recording of a graphics application. But first, we need some ground rules.
Getting it right
The first commandment, from which all others are derived, is that you shall absolutely and unequivocally avoid re-encoding your video multiple times. With each re-encoding, the quality of your video will degenrate into the image above. This is especially true if you know there will be yet another re-encoding step ahead where the settings are beyond your reach, for instance when uploading to Youtube: in this case a mostly unprocessed video is your best option.
These days the world has come down to some fairly standard aspect ratios: 16:9 for movies, 16:10 for displays. If you are recording 4:3 videos you’re doing it wrong! Because we’re creating a movie for the web, you may end up uploading it to various streaming platforms such as Youtube and Vimeo, which only deal with 16:9 ratios, so let’s just stick with that.
On the resolution front of these ratios the choices have been reduced to 720p (1280x720 pixels) and 1080p (1920x1080 pixels). We’ll most likely see new standards emerge for the upcoming 4k madness. In order to get a nice video file at the end, make sure that whatever you intend to record comes in either one of those two resolutions.
Not going for a standard aspect ratio and a standard resolution will force editing tools to rescale your video, causing sampling issues which will lead to blurry image quality. Sometimes you can’t avoid having a resolution that isn’t 720p or 1080p (capturing webcam videos for instance), but if you control the output just stick with the default. Videos which do not conform to either aspect ratio or resolution should be cropped and scaled manually with an external tool so that you control the quality and output instead of getting lucky with whatever your editing tool does to those videos.
Finally, all your videos should run with the same frame rate! If they don’t you either have to re-time everything to the lowest common denominator (which doesn’t require anything special but may not be great), or magically re-construct the missing frames with some optical-flow tool like Apple Cinema Tools or Twixtor (a lot of manual work ahead).
Dumping data
A popular way to obtain videos of a D3D or GL application are hooks like Fraps, NVIDIA ShadowPlay or DXTory. On Mac OS X, you can use Quicktime (File -> New Screen Recording) to record portions of the screen. If you haven’t done so already, check out a demo of one of them and try to record from a running game. An important decision has to be made upfront about resource division: record uncompressed videos for maximum quality and speed at very high data rates which can easily fill even the largest of hard disks, or sacrifice potentially vital CPU time to compress live during recording. There is no easy answer to this and it depends on your preferences and hardware settings. Personally, I prefer to record uncompressed and later downsize the videos into smaller, compressed segments for archiving. This certainly is no option to record World of Warcraft Boss fights of 10 minutes and more though.
I haven’t played around with Fraps too much and recently found a way to completely avoid it by piping raw RGBA frames from my D3D app directly into FFmpeg. You may use the following class to do the same.
#include <iomanip>
#include <ctime>
#include <sstream>

#include <D3D11.h>

#define tstringstream std::wstringstream
#define tcerr std::wcerr
#define tclog std::wclog

template<typename T>
void safe_release(T& obj)
{
    if (obj)
    {
        obj->Release();
        obj = nullptr;
    }
}

class video_recorder
{
protected:
    UINT                    width_,
                            height_,
                            fps_;
    ID3D11Texture2D*        ffmpeg_texture_;
    FILE*                   ffmpeg_;
    tstring                 path_;

public:
    void create(ID3D11Device* device, UINT width, UINT height, UINT fps, const tstring& path = L"../../data")
    {
        width_ = width;
        height_ = height;
        fps_ = fps;
        path_ = path;

        D3D11_TEXTURE2D_DESC desc;
        desc.Width = static_cast<UINT>(width);
        desc.Height = static_cast<UINT>(height);
        desc.MipLevels = 1;
        desc.ArraySize = 1;
        desc.SampleDesc.Count = 1;
        desc.SampleDesc.Quality = 0;
        desc.Format = DXGI_FORMAT_R8G8B8A8_UNORM;
        desc.Usage = D3D11_USAGE_STAGING;
        desc.BindFlags = 0;
        desc.CPUAccessFlags = D3D11_CPU_ACCESS_READ;
        desc.MiscFlags = 0;

        if (device->CreateTexture2D(&desc, nullptr, &ffmpeg_texture_) != S_OK)
            tcerr << L"Failed to create staging texture for recording" << std::endl;
    }

    void start_recording(bool compressed = false)
    {
        if (!ffmpeg_texture_)
            return;

        std::time_t t = std::time(nullptr);

        std::tm tm;
        localtime_s(&tm, &t);

        tstringstream file;
        file << path_ << "/record-" << std::put_time(&tm, L"%Y%m%d-%H%M%S") << L".mp4";

        // adapted from http://blog.mmacklin.com/2013/06/11/real-time-video-capture-with-ffmpeg/
        tstringstream cmd;
        cmd << L"ffmpeg -r " << fps_ << " -f rawvideo -pix_fmt rgba "
            << L"-s " << width_ << "x" << height_ << " "
            << L"-i - "
            << L"-threads 2 -y "
            << L"-c:v libx264 "
            << (compressed) ? L"-preset ultrafast -qp 0 " : L"-preset fast "
            << make_absolute_path(file.str())
            ;

        tclog << L"Recording video with: " << cmd.str() << std::endl;

#ifdef UNICODE
        ffmpeg_ = _wpopen(cmd.str().c_str(), L"wb");
#else
        ffmpeg_ = _popen(cmd.str().c_str(), "wb");
#endif

        if (!ffmpeg_)
            tcerr << L"Failed to initialize ffmpeg" << std::endl;
    }

    void stop_recording()
    {
        if (ffmpeg_)
            _pclose(ffmpeg_);

        ffmpeg_ = nullptr;
    }

    void add_frame(ID3D11DeviceContext* context, ID3D11RenderTargetView* rtv)
    {
        ID3D11Resource* resource;
        rtv->GetResource(&resource);
        add_frame(context, resource);
        safe_release(resource);
    }

    void add_frame(ID3D11DeviceContext* context, ID3D11Resource* resource)
    {
        context->CopyResource(ffmpeg_texture_, resource);

        D3D11_MAPPED_SUBRESOURCE msr;
        UINT subresource = D3D11CalcSubresource(0, 0, 0);
        context->Map(ffmpeg_texture_, subresource, D3D11_MAP_READ, 0, &msr);

        if (msr.pData && ffmpeg_)
        {
            fwrite(msr.pData, (width_ * height_ * 4), 1, ffmpeg_);
            context->Unmap(ffmpeg_texture_, subresource);
        }
    }

    void destroy()
    {
        stop_recording();
        safe_release(ffmpeg_texture_);
    }
};
Essentially the video_encoder class creates an open pipe to ffmpeg using the libx264 codec with zero compression. add_frame() copies a resource behind a RenderTargetView to a staging texture, which is then CPU read and fed to the pipe.
The crucial line is where the cmd stringstream is compiled: here you may want toggle compressed to have direct compression enabled and choose custom settings for -qp and -crf to control the compression rate. Either way, be warned that the resulting video is NOT compatible with MP4 support in browsers, because most of them only play content in YUV 4:2:0 color space and these settings output RGBA. I don’t have access to D3D11.1 where the staging texture can have DXGI_FORMAT_NV12, but if you do you may want to try this.
If you need maximum performance though, save the video uncompressed and compress it afterwards.
$ ffmpeg -i record-xxxx-xxxx.mp4 -c:v libx264\
         -crf 23 out.mp4
This will give you a nice, compressed MP4 which modern browser can directly display without plugins. You can upload it to your webpage and embed the video with an HTML5 video tag or put it on a Dropbox folder and people can directly watch it. If you plan to cut and edit the video though, skip this step.
Embedding videos into a webpage is easily done with the following code.
<video style="width:100%" controls autoplay>
	<source src="http://foo/bar.mp4" type="video/mp4">
	Your browser does not support the video tag.
</video>
The video should run on any modern browser without any plugins.
Editing
When it comes to video editing my weapon of choice is Final Cut 7, which I’ll use to illustrate an important point: most if not all bigger editing tools use a special codec for cutting a video. Apple tools such as FCP and iMovie use the ProRes codec, which comes in several forms (Proxy, LT, HQ). If you value your time, don’t want your editing tool to arbitrarily recompress your snippets and maintain full control consider re-encoding your raw FFmpeg dump manually with such a codec. In case of FCP, this will also allow you to use blending operations and other effects without FCPs further interference.
At this point I cannot overstate the magnificent gloriosity of MPEGStreamClip: it’s an easy to use free frontend for the Quicktime compressor on Windows and Mac OS X and it has a GUI for batch processing. I usually dump all my videos into the batch list and encode them with Apple ProRes 422 (HQ) at 100% quality. You can also use FFmpeg and simply script this behavior if you’re good with the command line. If you have a funny resolution, MPEGStreamClip also has some options to crop and scale the video. A very similar aweseome tool is Handbrake which comes with some neat settings for common enddevices such as smartphone and tablets. Yet another tool for simple cutting, scaling and cropping operations is Virtual Dub, which however doesn’t handle the encoding side as nicely.
Converting to the final format
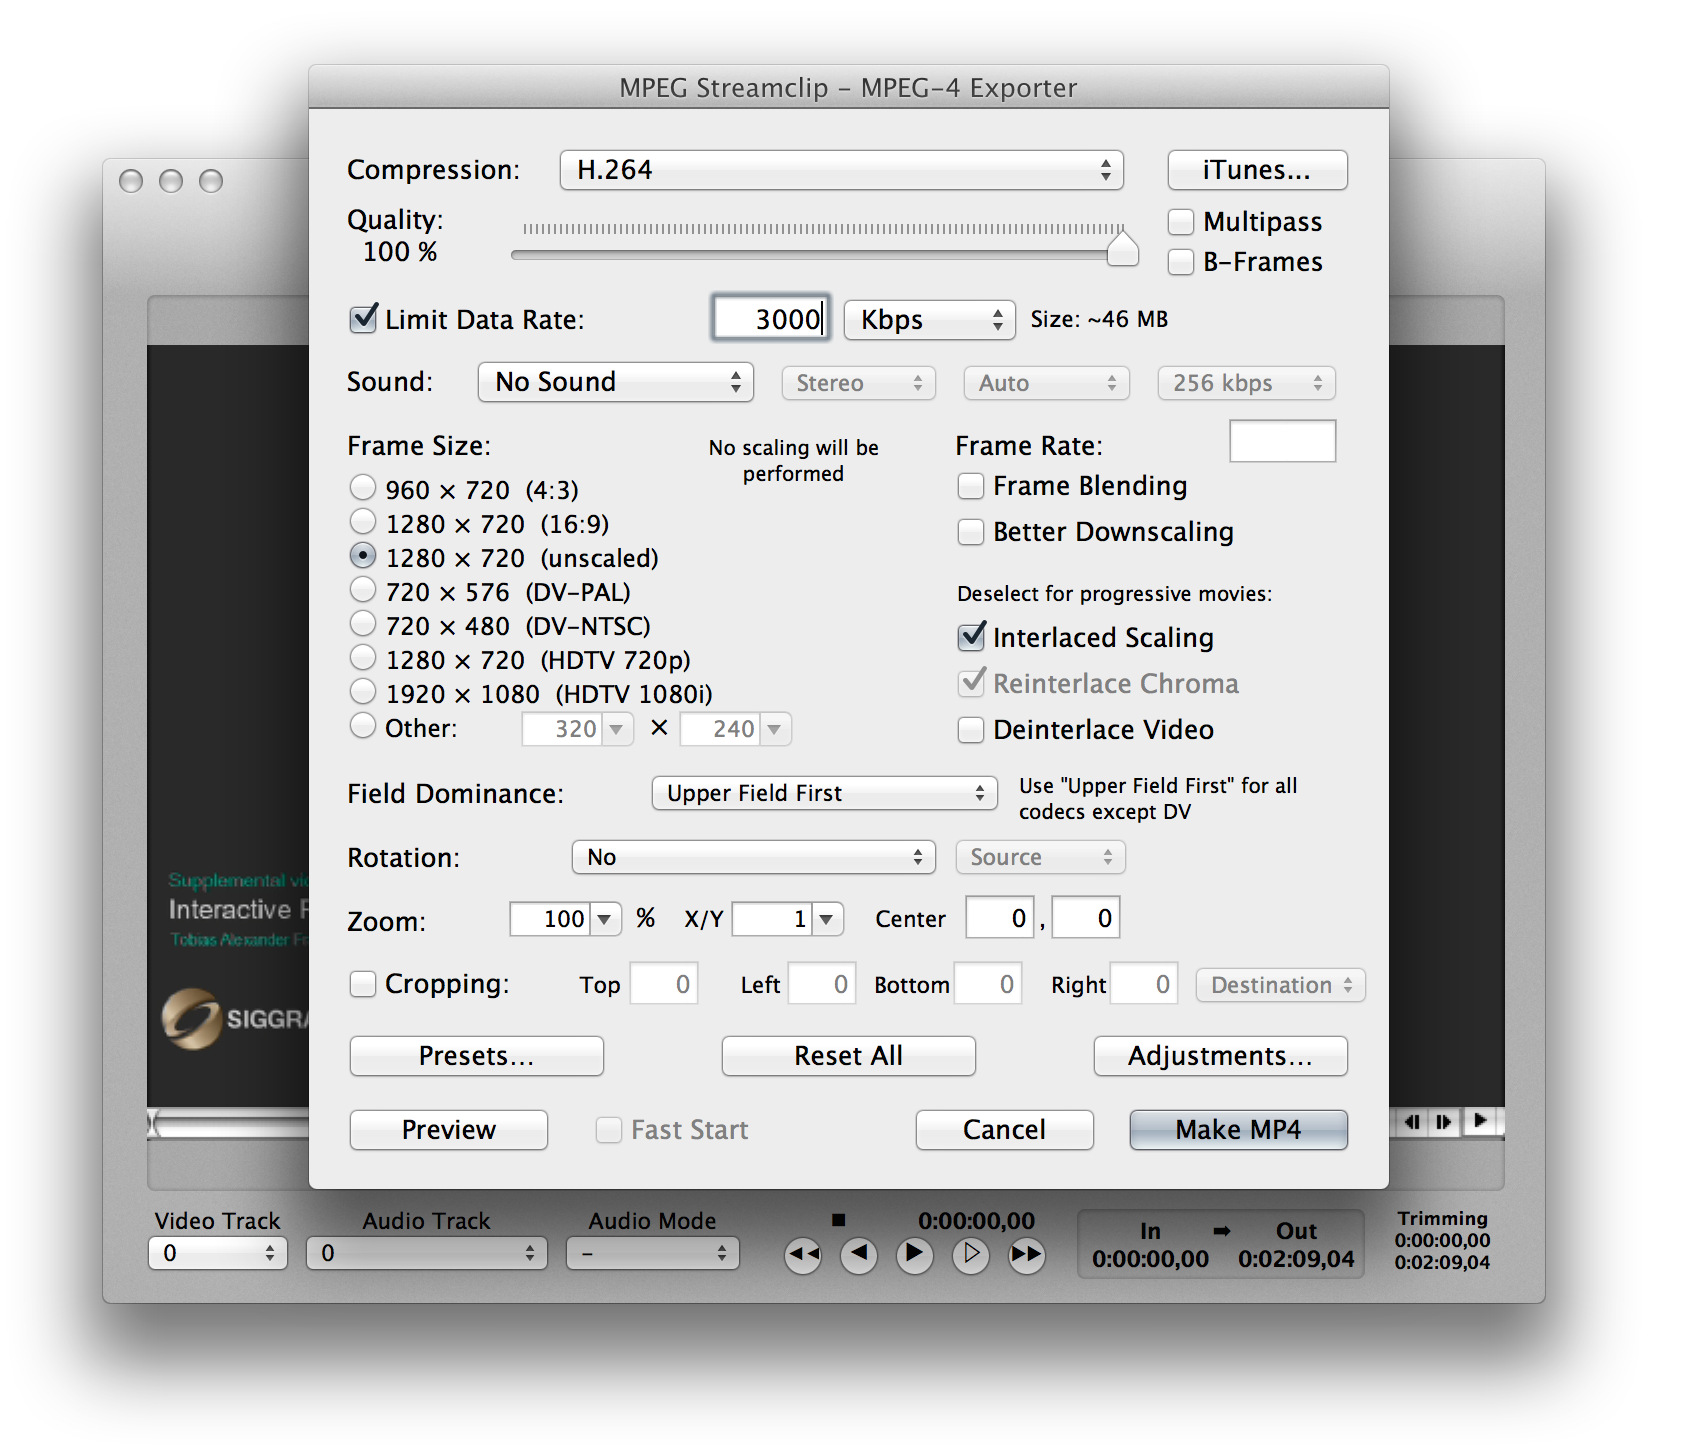
When you are done with the clip, the video is exported into its final format. Here you should take care to use a standard container (no, not WMV/ASF) with a standard video and audio codec (no, not Fraps or Cinepak or DivX or …) so that the video will work in Safari, Chrome, Firefox and Opera directly and play with the default video player of the operating system, even on mobile devices. You may use the command above for FFMpeg (and add audio settings if necessary), or use MPEGStreamclip like this:
- Open your uncompressed, edited video
- Go to File -> Export to MPEG-4
- Choose H.264 compression
- Select 100% quality
- Limit the data rate to 3000-8000 kbps
- Disable sound if there is none in the video
- Export the video
And that’s it, you’re done. Prepare some template Photoshop intro and outro images (which contain paper title, author names, logos of the conference) and creating new videos from recorded material should be an effort of minutes!
The checklist
- All videos have the same resolution and framerate
- All videos are either 720p or 1080p
- You have re-encoded them with the intermediate codec of your editing tool
- You have created a project in said editing tool with the same resolution and framerate of your videos
- The final output is H.264
Another helpful resource is the Youtube advanced encoding page, which has two tables for recommended bitrates for standard and high quality movies.
References
- FFmpeg
- MPEGStreamClip
- Fraps
- DXTory
- NVIDIA, Shadowplay
- Miles Macklin, Real-Time Video Capture with FFmpeg
- Google, Youtube Advanced Encoding